

Nap time struggles are real. If you’re a parent watching your baby fight sleep or waking after 20 minutes, you know how frustrating this can be. At Babyslover, we understand that inconsistent naps affect your entire day—and your sanity. You’re not alone in this challenge.
The Ferber Method is one of the most popular sleep training techniques parents use to help their babies (and toddlers) develop independent sleep skills. While many parents associate it with nighttime sleep, this method can be incredibly effective for naps too. In fact, many parents find that nap training is actually easier to start with, since there’s more natural wake time between naps.
In this complete guide, we’ll walk you through exactly how to use the Ferber Method for naps. We’ve tested this approach, reviewed the research, and gathered real-world parent experiences. Whether you’re dealing with short naps, nap refusal, or trying to establish a solid nap schedule, this guide will give you the tools and confidence you need.
Contents
- 1 What is the Ferber Method?
- 2 Why Use the Ferber Method for Naps?
- 3 When to Start Ferber Method for Naps?
- 4 Step-by-Step: How to Use the Ferber Method for Naps
- 4.1 Step 1: Establish a Nap Routine (Days Before Starting)
- 4.2 Step 2: Prepare Your Baby (Night Before)
- 4.3 Step 3: Follow Your Nap Routine
- 4.4 Step 4: Wait for the First Interval
- 4.5 Step 5: The First Check-In
- 4.6 Step 6: Increase Your Intervals
- 4.7 Step 7: Keep Going Until Sleep Happens
- 4.8 Step 8: Repeat for Every Nap
- 4.9 Step 9: Track Your Progress
- 5 Ferber Method Naps Chart: Complete Timing Guide
- 6 Ferber Method for Naps vs Night Sleep: Key Differences
- 7 Tips for Success with Ferber Method Naps
- 7.1 Tip 1: Make Sure Your Baby Is Actually Tired
- 7.2 Tip 2: Get Your Partner (or Support) On Board
- 7.3 Tip 3: Expect Resistance on Days 2-3
- 7.4 Tip 4: Stay Calm During Check-Ins
- 7.5 Tip 5: Check Your Nap Schedule
- 7.6 Tip 6: Don’t Let Them Get Hungry
- 7.7 Tip 7: Use White Noise
- 7.8 Tip 8: Keep Your Baby’s Room Dark
- 7.9 Tip 9: Stay Consistent—Even When It’s Hard
- 7.10 Tip 10: Celebrate Small Wins
- 7.11 Tip 11: Know When to Pause
- 7.12 Tip 12: Trust the Process
- 8 Conclusion
- 9 FAQ
- 9.1 How long does the Ferber Method take to work?
- 9.2 Can I use the Ferber Method if I bed-share or co-sleep?
- 9.3 What if one nap works but another doesn’t?
- 9.4 Is the Ferber Method the same as “cry it out”?
- 9.5 What if my baby doesn’t sleep after doing Ferber Method?
- 9.6 Can I use the Ferber Method if my baby has reflux?
- 9.7 Can I use a video monitor during Ferber training?
- 9.8 Can I combine Ferber with other methods?
- 9.9 How do I know if my baby is ready for the Ferber Method?
What is the Ferber Method?
The Ferber Method is a sleep training technique developed by Dr. Richard Ferber, a pediatric sleep specialist. It’s sometimes called “cry it out” or “graduated extinction,” but that’s only part of the story.
Here’s the basic idea: Instead of immediately responding to your baby’s cries, you wait for gradually increasing intervals before going in to check on them. The goal isn’t to let your baby cry endlessly. Instead, you’re teaching them that they can fall asleep on their own, even if it takes some practice.
During each check-in, you keep things brief and calm. You’re not picking up your baby or staying long. You’re simply reassuring them that you’re there, they’re safe, and it’s time to sleep. Then you leave the room again and wait for the next interval.
Here’s what makes it different from “crying it out”:
With the Ferber Method, you’re actively involved through scheduled check-ins. You’re teaching self-soothing skills gradually, not abandoning your baby. This is an important distinction many parents don’t realize, and it’s why the method has research backing it.
Why Use the Ferber Method for Naps?
You might be wondering: Is it worth doing sleep training specifically for naps? We think it is. Here’s why:
Your baby learns independent sleep skills. When your baby can fall asleep on their own during naps, that skill carries over to bedtime too. It’s one of the most valuable things you can teach your child.
It creates predictable nap schedules. Many sleep struggles come from babies who can’t fall asleep without parental help. With the Ferber Method, naps become more reliable. Your baby learns to nap at consistent times, which helps with hunger cues, mood, and nighttime sleep too.
It gives you back your time. This is real. If your baby only naps while being held or rocked, you’re stuck. The Ferber Method frees you to shower, eat lunch, work, or just rest while your baby sleeps independently.
It reduces overtiredness. Babies who don’t nap well become overtired. Overtired babies actually sleep worse, cry more, and are harder to manage. Teaching independent napping breaks this cycle.
It’s typically easier than sleep training at night. Many parents find success with nap training first because babies have more natural alertness during the day. Nighttime sleep is deeper and more driven by biology, making it sometimes harder to train initially.
Research supports it. Studies show that graduated extinction (the Ferber Method) is effective for improving sleep and doesn’t cause long-term emotional harm. Your baby won’t be damaged by learning to self-soothe.
When to Start Ferber Method for Naps?
Timing matters. If you start too early, your baby isn’t developmentally ready. Too late, and you might face more resistance. Here’s what you should know:
Best age to start: Most pediatricians recommend starting the Ferber Method between 4 and 6 months old. By this age, babies are neurologically capable of falling asleep independently, though they may not have learned how yet.
Can you start earlier? Not really. Newborns (0-3 months) need frequent feeding and don’t have the neurological development to self-soothe. Pushing sleep training too early often backfires and is harder on everyone.
Can you start later? Absolutely. Older babies and toddlers can use this method, though they may have more entrenched habits. Starting at 6-12 months is still very effective. Starting after 12 months works too, it just might take longer.
Health check first: Before starting any sleep training, make sure your baby is healthy. Check with your pediatrician, especially if your baby has:
- Reflux or other medical conditions
- Recently gotten sick
- Been through big changes (moving, new sibling, etc.)
Consider their readiness: Your baby should be:
- Taking at least 2 naps per day (ideally 3)
- Old enough to understand object permanence (around 6+ months)
- Generally healthy and well-fed
- On a consistent schedule (or close to it)
Good time to start: Many parents find success starting the Ferber Method on a weekend or when they have support at home. You’ll want calm, low-stress days to start.
Step-by-Step: How to Use the Ferber Method for Naps
Ready to start? Here’s exactly how to implement the Ferber Method for naps:
Step 1: Establish a Nap Routine (Days Before Starting)
Before you begin sleep training, create a simple nap-time routine. This signals to your baby that sleep is coming. Keep it short—5 to 10 minutes is plenty.
Your routine might look like:
- Dim the lights
- Read a short book
- Sing a song
- Give a kiss
- Lay your baby down
Do this same routine every nap time, even before you officially start Ferber training. This consistency helps so much.
Step 2: Prepare Your Baby (Night Before)
Explain what’s happening in simple terms if your baby can understand (6+ months). You might say: “Tomorrow, when we put you down for nap time, I’m going to leave the room. I’ll come back to check on you. You can do this.”
You’re not promising anything or making it complicated. You’re just being honest.
Step 3: Follow Your Nap Routine
Do your nap routine exactly as planned. Keep it calm and consistent. When the routine ends, place your baby down while they’re still awake (this is key) and leave the room.
Step 4: Wait for the First Interval
This is where the method actually begins. You’re going to wait before going back in.
Your first interval depends on your comfort level. Many parents start with 3 minutes. Some start with 5. There’s no perfect number—start where you feel okay starting.
Set a timer so you know exactly when to check in.
Step 5: The First Check-In
When your timer goes off, go back in. Keep it brief—30 seconds maximum. Here’s what to do:
- Stay calm (even if your baby is very upset)
- Speak in a quiet, soothing voice
- Pat their back or chest gently
- Say something simple: “I’m here. You’re okay. It’s time to sleep.”
- Don’t pick them up
- Don’t turn on lights
- Don’t get frustrated with them
- Leave immediately after about 30 seconds
Step 6: Increase Your Intervals
After your first check-in, you wait longer before the next one. If you started with 3 minutes, your second interval might be 5 minutes. Then 7 minutes. Then 10 minutes.
The intervals get longer each time you check in. This teaches your baby that you always come back, but you’re gradually giving them more opportunity to settle themselves.
Step 7: Keep Going Until Sleep Happens
You repeat this process—waiting, checking in, lengthening intervals—until your baby falls asleep. This might take 20 minutes. It might take an hour on the first day.
Yes, it’s hard. Yes, your baby will cry. This is where honesty matters: the first few days are tough. By day 3-5, most babies show significant improvement. By day 7-10, many babies fall asleep independently.
Step 8: Repeat for Every Nap
Consistency is everything. You do this for every nap, not just one. If you only do it once a day, your baby gets mixed signals and progress slows dramatically.
Step 9: Track Your Progress
Keep notes on how long it took, how your baby responded, and any patterns. This helps you see progress when it feels slow and reminds you why you’re doing this.
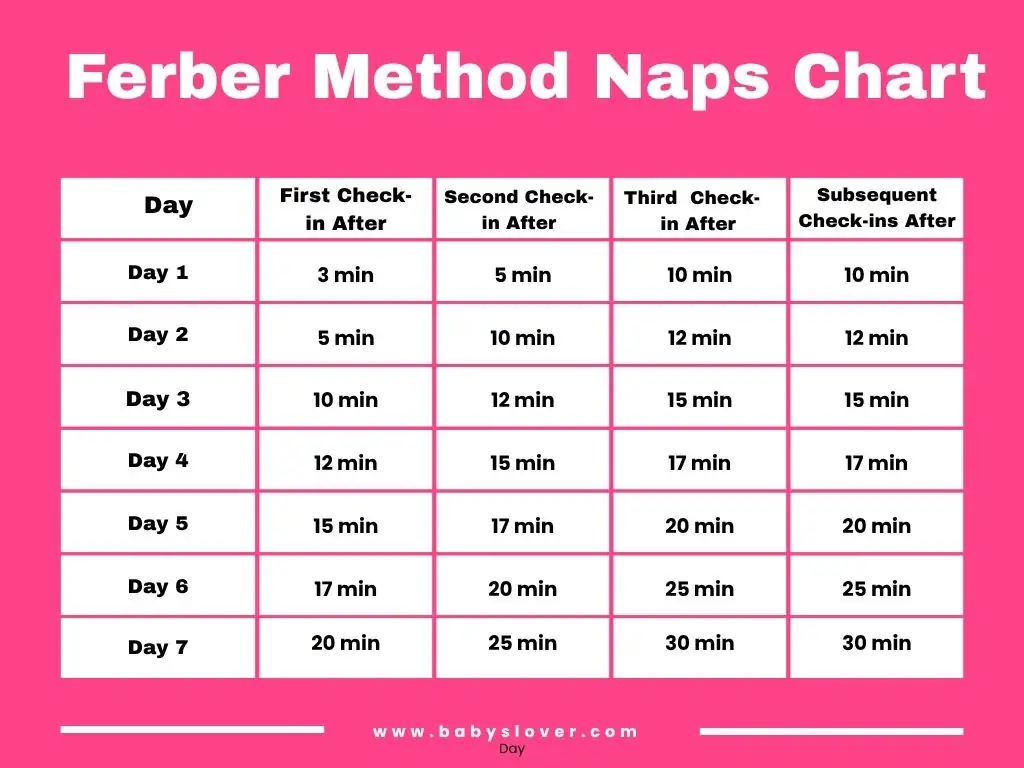
Ferber Method Naps Chart: Complete Timing Guide
Here’s a complete chart showing recommended wait intervals for the Ferber Method with naps. This is a starting point—adjust based on your baby’s needs and your comfort level.
Standard Ferber Method Naps Chart (First 3 Days)
| Check-In # | Day 1 Interval | Day 2 Interval | Day 3 Interval |
|---|---|---|---|
| 1st | 3 min | 3 min | 5 min |
| 2nd | 5 min | 5 min | 7 min |
| 3rd | 7 min | 7 min | 9 min |
| 4th | 9 min | 9 min | 11 min |
| 5th | 11 min | 11 min | 13 min |
| 6th | 13 min | 13 min | 15 min |
| 7th | 15 min | 15 min | 15 min |
Continue intervals at 15 minutes until sleep occurs
Extended Ferber Method Naps Chart (Days 4-7+)
| Check-In # | Day 4+ Interval |
|---|---|
| 1st | 5 min |
| 2nd | 10 min |
| 3rd | 15 min |
| 4th | 20 min |
| 5th | 30 min |
Once your baby falls asleep independently, you may not need to do check-ins
Important Notes About the Chart
Your baby might fall asleep before you reach the longest intervals. Great! That’s the goal. Once they’re asleep, you’re done for that nap.
Some days are harder than others. This is completely normal. Weather, hunger, growth spurts, or developmental leaps can affect how your baby responds. Stay consistent anyway.
You might not reach all intervals. Some babies fall asleep after 3 check-ins on Day 1. Others take longer. Both are normal.
Longer wait times are okay. If 15 minutes feels too long for you, start smaller. If 3 minutes feels too short, start with 5. The method works with different intervals—consistency matters more than the exact numbers.
Every baby is different. This chart is a guideline, not a law. Some babies respond in 3 days. Others take 2 weeks. Both are considered success in sleep training.
Ferber Method for Naps vs Night Sleep: Key Differences
You might be wondering if you should use the same approach for naps and nighttime sleep. The answer is mostly yes, but there are important differences:
Nap Training vs Night Sleep Training
Why naps are sometimes easier:
- Babies have more natural alertness during the day
- You’re fighting biology less with daytime sleep
- There’s often only 1-3 hours until the next sleep period, making breaks more manageable
- Many parents see faster results with naps
Why night sleep is different:
- Babies are biologically driven toward longer nighttime sleep
- Melatonin kicks in, making nighttime sleep deeper
- Night awakenings are different from nap struggles
- Nighttime often requires longer wait before sleep happens
Should you do both at once? Most experts recommend starting with naps first, then moving to nighttime sleep after naps are solid (usually 1-2 weeks in). This gives your baby one area of success and gives you a win to build on.
Some parents do both simultaneously if they’re consistent. It’s harder but possible.
What stays the same:
- The basic method (wait, check in, reassure, leave)
- The need for consistency
- The importance of routine
- The timeline (usually 3-7 days to see improvement)
What’s different:
- Night intervals might be longer (baby is more tired)
- You might be more exhausted at night, making consistency harder
- Your baby’s sleep cycles are different (deeper at night)
- Recovery is faster with nighttime sleep—a rough night doesn’t undo progress
Tips for Success with Ferber Method Naps
We’ve seen what works and what doesn’t. Here are our best tips for making the Ferber Method successful for naps:
Tip 1: Make Sure Your Baby Is Actually Tired
The Ferber Method works best when your baby is tired but not overtired. If they’re not tired enough, they won’t have the neurological drive to sleep. If they’re overtired, they’ll fight harder.
Watch for tired signs: eye rubbing, yawning, less interest in toys, quieter than usual. That’s when you start your nap routine.
Tip 2: Get Your Partner (or Support) On Board
If you have a partner, make sure you’re both doing this the same way. If Mom does Ferber but Dad rocks the baby to sleep, your baby gets confused and progress stalls.
Consistency across caregivers is huge.
Tip 3: Expect Resistance on Days 2-3
Most parents see: Day 1 (moderate resistance), Day 2-3 (worse resistance—this is called an “extinction burst”), Day 4+ (improvement). The extinction burst is normal and actually a sign it’s working.
Don’t give up on Day 3. Push through.
Tip 4: Stay Calm During Check-Ins
Your baby can sense your anxiety. If you go in looking worried or stressed, they pick up on it. Keep check-ins boring and calm. Your message is: “You’re safe, it’s time to sleep, I’ll be back.”
Tip 5: Check Your Nap Schedule
Make sure your nap schedule makes sense. Naps that are too close together confuse sleep drive. Most babies do better with at least 2-2.5 hours between nap start times.
If your schedule is off, fix that before starting Ferber or while doing it.
Tip 6: Don’t Let Them Get Hungry
Make sure your baby is well-fed before starting nap time. A hungry baby won’t sleep, and they’ll cry for legitimate reasons. This makes Ferber training ineffective.
Feed your baby, wait 30 minutes, then start nap time.
Tip 7: Use White Noise
White noise masks household sounds and signals “it’s sleep time.” Many parents find this helps significantly with the Ferber Method.
Tip 8: Keep Your Baby’s Room Dark
Light signals wakefulness. A dark room (or mostly dark) supports sleep. Use blackout curtains if you need to.
Tip 9: Stay Consistent—Even When It’s Hard
The biggest reason Ferber Method “doesn’t work” is that parents aren’t consistent. If you do it for 3 days, stop, then start again, your baby learns that persistent crying wins.
Commit to at least 7 days of consistency. That’s usually how long it takes to see real change.
Tip 10: Celebrate Small Wins
Day 1 took 45 minutes? Day 2 took 30? That’s progress. Celebrate it. Your baby is learning. You’re doing a great job, even though it’s hard.
Tip 11: Know When to Pause
If your baby is sick, teething badly, or going through a big life change (new sibling, moving), it’s okay to pause sleep training. Resume when things settle down. This won’t ruin your progress.
Tip 12: Trust the Process
At Babyslover, we’ve seen thousands of parents succeed with the Ferber Method for naps. It works. The first few days are hard. But most babies show significant improvement by day 5-7. You can do this.
Conclusion
The Ferber Method for naps is one of the most effective tools you have to help your baby develop independent sleep skills. It’s not the easiest path in the short term, but it creates lasting change.
At Babyslover, we believe you have everything you need to succeed with this method. You know your baby. You understand their needs. You’re willing to put in the work. That’s what matters.
Remember: There’s no perfect way to parent, only your way. If the Ferber Method feels right for your family, go for it. If it doesn’t align with your parenting philosophy, that’s okay too—there are other methods out there.
Whatever you choose, know that you’re doing a great job. Your baby is lucky to have a parent who cares enough to learn about sleep training, even when it’s uncomfortable.
You’ve got this. And if you need support along the way, we’re here for you.
FAQ
How long does the Ferber Method take to work?
Most babies show improvement within 3-7 days. Some improve faster, some take longer. Consistency matters more than speed. By day 10, you should see meaningful change if you’ve been consistent.
The Ferber Method typically requires your baby to be in their own space (crib, bassinet, or separate room). If you co-sleep, you might need a different sleep training method. Talk to your pediatrician about alternatives.
What if one nap works but another doesn’t?
This is common! You might see success with the morning nap but struggle with the afternoon nap. Keep going with the same method for all naps.
Is the Ferber Method the same as “cry it out”?
No. True “cry it out” is when you don’t check on your baby at all. The Ferber Method includes scheduled check-ins where you reassure your baby. This is an important difference.
What if my baby doesn’t sleep after doing Ferber Method?
First, check your nap schedule and make sure your baby is tired. Second, give it more time—sometimes it takes 2+ weeks for full success. Third, consider seeing a pediatric sleep consultant if you’ve been consistent for 3+ weeks with no progress.
Can I use the Ferber Method if my baby has reflux?
Check with your pediatrician first. Babies with reflux might struggle with certain positions. Once reflux is managed, the Ferber Method can be effective.
Can I use a video monitor during Ferber training?
Yes, many parents do. Knowing your baby is safe through a monitor can help you stay calm and committed to the method.
Can I combine Ferber with other methods?
Not really. Mixing methods (like some Ferber check-ins plus some rocking) confuses the process. Pick one method and stick with it for at least 1-2 weeks before switching.
How do I know if my baby is ready for the Ferber Method?
Signs of readiness include: 4+ months old, generally healthy, on a consistent schedule (or close to it), and you’re ready to commit to consistency. When you answer yes to all of these, your baby is probably ready.
3 thoughts on “Ferber Method for Naps: Complete Guide with Chart”