

Chair Method Sleep Training can feel like a game-changer when you’re desperate for sleep. At Babyslover, we understand how exhausting it can be when your little one fights bedtime or wakes throughout the night.
If you’re tired of battles at bedtime and ready for a gentler approach that keeps you connected to your child while they learn to sleep independently, this guide is for you. We’re going to walk you through everything you need to know about chair method sleep training—how it works, when to start, and exactly how to do it with step-by-step instructions.
Whether you’re looking for a modified chair method sleep training strategy that feels supportive and loving, you’ve come to the right place.
Contents
- 1 What is the Chair Method Sleep Training?
- 2 How the Chair Method Works
- 3 What Age Is Best for Chair Method Sleep Training?
- 4 How the Chair Method Works (In Practice)
- 5 Chair Method Sleep Training Chart
- 6 Does the Chair Method Work for Naps?
- 7 How Long Does the Chair Method Sleep Training Take to Work?
- 8 Mistakes to Avoid When Using This Approach
- 9 Tips for Faster Success with Chair Method Sleep Training
- 10 Frequently Asked Questions
- 10.1 Can I use the chair method if my child is in a bed instead of a crib?
- 10.2 Is the chair method safe?
- 10.3 Can I use the chair method if I have multiple children?
- 10.4 What if I see my child crying? Should I comfort them?
- 10.5 Can I use the chair method part-time?
- 10.6 What do I do if my child has a regression?
- 11 Conclusion
What is the Chair Method Sleep Training?
Here’s the simple version: you sit in a chair next to your child’s bed, and over several weeks, you gradually move that chair farther and farther away. Sounds easy, right? It actually is, in concept. But what makes it beautiful is what it does for your child and your relationship.
Think about it from your little one’s perspective. They’ve been used to you being right there—whether through co-sleeping, nursing to sleep, or rocking them down every single night. Suddenly asking them to fall asleep alone? That can feel scary and abandoned. But with chair method sleep training, you’re saying, “I’m still here. I’m not leaving you. We’re just going to do this a little differently.”
Your child learns that falling asleep is something they can do, even when you’re not touching them. They discover their own ability to settle down. And you get to stay present through the whole process, watching them grow more confident each night. That’s the magic of the chair method sleep training approach.
How the Chair Method Works
The chair method is based on a simple principle. On night one, your chair sits right next to your child’s crib or bed. Close enough to touch them, reassure them, maybe even hold their hand. Your child falls asleep knowing you’re right there. This is comforting and predictable.
A few nights in, you move your chair back—maybe just 6 inches. Your child can still see you clearly, but they’re beginning to experience a tiny bit of distance. Over the following weeks, every few nights, you move that chair back a little more. Gradually, it creeps toward the edge of the room, then out the door, then down the hallway.
The genius of this method is that it happens so slowly your child barely notices. They don’t experience the shock of suddenly being alone. Instead, they have hundreds of opportunities to prove to themselves that they can fall asleep without you holding them, and that you still come back.
Your child learns that nighttime means a calming routine, your presence, and gradually learning to put themselves to sleep. And you learn that you can be supportive while still teaching your child important skills. With chair method sleep training, it’s a win for everyone.
What Age Is Best for Chair Method Sleep Training?
You might be wondering if your child is ready for chair method . Age matters, but what matters even more is whether your child is developmentally ready.
Generally speaking, chair method sleep training works best for children around 6 months and older. By this point, babies have developed enough neurologically to begin learning new sleep patterns. Their internal clock is more organized, and they’re not waking every two hours from genuine hunger.
That said, we know every baby is wonderfully different. Some children younger than 6 months can respond to the chair method sleep training, but babies under 4-5 months really do need more frequent feeding and comfort. There’s no shame in waiting a bit.
At Babyslover, we honestly believe readiness is more important than age. Your child might be ready for chair method sleep training if they can self-soothe a little (like sucking their thumb), understand simple cause and effect, and are sleeping in their own sleep space.
If your baby is sick, teething, or going through a big change like moving houses or welcoming a new sibling, waiting a few weeks often leads to much better results. Timing your chair method sleep training for stable periods sets your whole family up for success.
For more guidance on different sleep training approaches, explore our Pick Up Put Down Method Complete Sleep Training Guide with Chart to find other options that might work for your family.
How the Chair Method Works (In Practice)
Let’s talk about what actually happens when you sit down in that chair. This is the real stuff—what parents want to know about chair method sleep training.
Step 1: Prepare Your Sleep Space
Before you even start, make sure your child’s room is set up for sleep success. This means dark, quiet, and at a comfortable temperature. A white noise machine can be a game-changer—it masks household sounds and creates a consistent background that actually helps kids fall asleep.
Have your chair ready. This might sound silly, but we recommend using the same chair throughout the entire process. Your child will begin to associate that specific chair with bedtime, and that familiarity becomes part of the comfort. It’s one less variable, and consistency is your secret weapon.
Step 2: Create a Calming Bedtime Routine
Before you even think about chair method sleep training, build a strong bedtime routine. This might include a bath, a story, singing a song, cuddles, or any calm activities that signal to your child’s body that sleep is coming. Keep it the same every single night.
We’re talking 20-30 minutes of winding down. Same time each night. This consistency actually regulates your child’s natural sleep rhythms, making it easier for them to fall asleep. You’re not fighting their biology—you’re working with it.
Step 3: Start with Your Chair Right Next to Them
On the first night, position your chair as close as you can—right next to your child’s crib or bed. You might even hold their hand or gently touch their back. Your presence is deeply calming and reassuring. They know you’re there, and that matters.
During this initial phase, respond to your child when they cry or get upset. Pat their back, use a soothing voice, offer comfort. The goal isn’t to ignore them. It’s to stay close while they’re learning to settle down. You’re teaching them that their needs matter and that you’re present, while also giving them space to practice falling asleep.
Step 4: Move Your Chair Gradually
After 3-7 nights (or when you notice your child falling asleep more easily), move your chair back a few feet. Not across the room yet—just a little distance. Maybe 6-12 inches. It might feel dramatic to them, but to everyone else, it’s barely noticeable.
Continue moving your chair back every few nights. And here’s the important part: the pace depends on your child and your comfort level. Some families move every 3 nights; others take a week between moves. There’s no “right” speed. Move at the pace that feels manageable for your family. This is a marathon, not a sprint.
Step 5: Move Your Chair Toward the Door
Over the course of several weeks, keep moving your chair back until it’s near the bedroom door. At this point, you’re still in the room, but your child has experienced increasing distance between you. They’re learning that distance doesn’t mean abandonment.
By now, many children are falling asleep more independently. They’ve learned that you’re still there even when you’re farther away. They’ve built confidence in their own ability to settle down. This is wonderful progress, and it’s worth celebrating.
Step 6: Move Just Outside the Room
Once your chair is at the door, the next step is moving just outside. Keep the door open so your child can see you’re nearby. Sit just outside the room where your child can still see you if they look. They know where you are. You’re just in a slightly different location.
Step 7: Gradual Distance from the Door
Finally, move your chair gradually down the hallway and farther from the room. Your child learns that you’re still nearby, just not in the room. Eventually, your child falls asleep without needing to see you. They trust that you’re there and that you’ll come back in the morning.
This entire process typically takes 4-8 weeks, though some children move faster and others need 10-12 weeks. Patience here pays off tremendously—you’re building healthy sleep skills that will benefit your child for years.
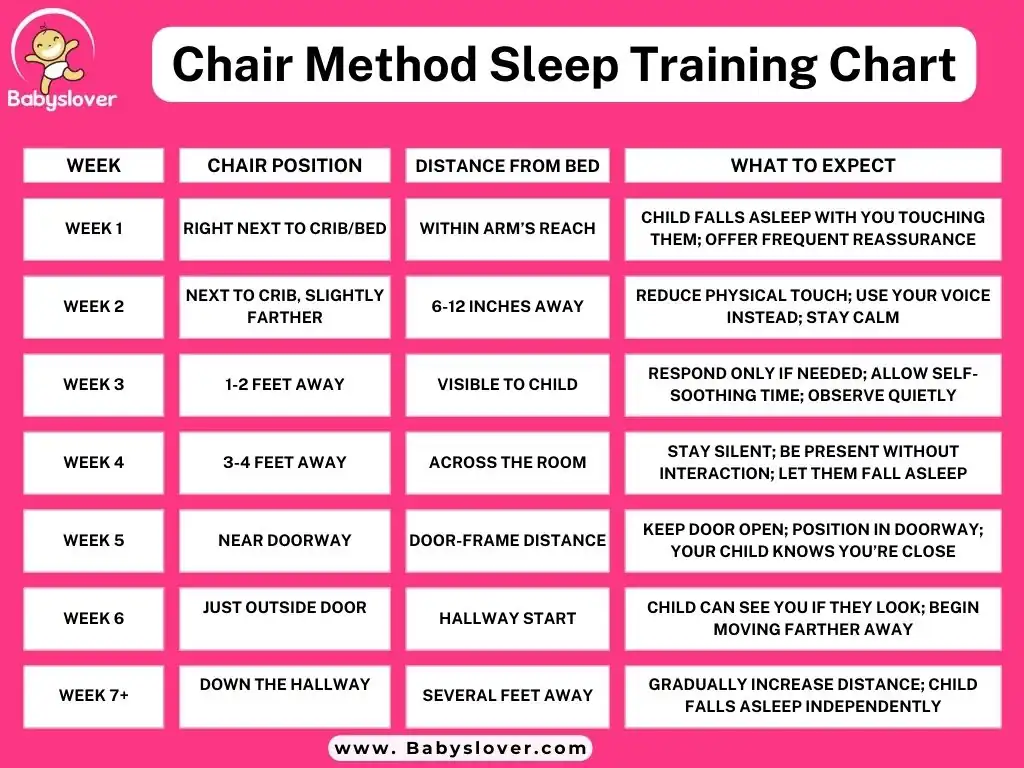
Chair Method Sleep Training Chart
Here’s a visual guide to help you track your progress and understand what to expect. This shows a typical 6-week progression, though your timeline might look different. That’s completely okay.
| Week | Chair Position | Distance from Bed | What to Expect |
|---|---|---|---|
| Week 1 | Right next to crib/bed | Within arm’s reach | Child falls asleep with you touching them; offer frequent reassurance |
| Week 2 | Next to crib, slightly farther | 6-12 inches away | Reduce physical touch; use your voice instead; stay calm |
| Week 3 | 1-2 feet away | Visible to child | Respond only if needed; allow self-soothing time; observe quietly |
| Week 4 | 3-4 feet away | Across the room | Stay silent; be present without interaction; let them fall asleep |
| Week 5 | Near doorway | Door-frame distance | Keep door open; position in doorway; your child knows you’re close |
| Week 6 | Just outside door | Hallway start | Child can see you if they look; begin moving farther away |
| Week 7+ | Down the hallway | Several feet away | Gradually increase distance; child falls asleep independently |
How to Use This Chart:
Think of this as a guideline, not a strict rule carved in stone. Your child might need to spend two weeks at one position before you feel comfortable moving forward. That’s completely normal and actually very healthy. Some children progress faster, especially toddlers who understand the routine better. Others move slowly, and that’s their pace.
If you notice your child getting truly upset when you move the chair back, pause. Stay at that distance for a few more nights. Consistency and your child’s emotional comfort matter way more than sticking to a timeline. Your child will get there.
Does the Chair Method Work for Naps?
So many parents ask us this, and we love the question because it shows you’re thinking about the whole picture.
The Short Answer:
Yes, the approach works for naps. But there’s a catch—it takes longer.
Why Naps Are Harder:
Naps are naturally harder than nighttime sleep because of your child’s circadian rhythms. Their body is literally wired to be awake during daylight. So naps require more from you and more time for your child to master.
At Babyslover, we usually recommend focusing on nighttime sleep first. Once your child is sleeping well at night using chair method sleep training, naps often improve naturally. It’s like once they understand the skill of falling asleep independently, their body applies it during the day too.
If You Want to Tackle Naps:
Apply the same gradual distance approach you’re using at night. Keep nap times consistent (same time each day), use blackout curtains to darken the nap room, and use your same chair. Just expect it to take 8-12 weeks rather than 4-8. And be patient—naps are naturally harder.
Some children master nighttime sleep beautifully but still need extra help with naps. This is completely normal and doesn’t mean anything is wrong. It just means your child learns at their own pace, and that’s perfect.
How Long Does the Chair Method Sleep Training Take to Work?
We know you want results. You’re exhausted. You deserve sleep. So let’s be realistic about what to expect.
Early Wins (Weeks 2-3):
Most families see noticeable improvements within 2-3 weeks. Your child might cry less at bedtime, fall asleep 10-15 minutes sooner, or wake fewer times during the night. These early wins feel absolutely amazing and honestly motivate you to keep going.
Full Success (Weeks 4-8+):
Complete independence—where your child falls asleep without you in the room—typically takes 4-8 weeks. Some children get there faster; others need 10-12 weeks. This isn’t a failure. It’s just their pace of learning, and all paces are valid.
What Success Actually Looks Like:
- Your child falls asleep within 15-20 minutes
- Fewer or no tears at bedtime
- Fewer night wakings
- Your child can settle themselves if they wake briefly during the night
- Bedtime feels calmer and less stressful for everyone
- You’re getting more sleep too
Factors That Affect Your Timeline:
- Child’s age: Younger babies might take a bit longer
- Previous sleep habits: Children used to co-sleeping might need more time to adjust
- Consistency: Families who stick to the routine see faster results
- Other big changes: Moving, new siblings, or illness can slow progress
- Your child’s temperament: Some children naturally adapt faster; others are more cautious
The key to success with chair method sleep training is consistency. Skipping nights or going backward teaches your child that persistence works—and that’s not what you’re aiming for. Stick with it, even when progress feels slow. Trust the process.
Mistakes to Avoid When Using This Approach
We’ve worked with so many families, and we’ve seen patterns. Most struggles happen not because the method doesn’t work, but because of common mistakes. Let’s talk about what to avoid so you can have the smoothest experience possible.
Mistake #1: Moving the Chair Too Fast
This is huge. If you move your chair too quickly, your child might become distressed or anxious. They haven’t had enough time to adjust to each distance and feel secure at that spot. Move slowly. If your child gets upset when you move the chair back, move it back closer for a few more nights. There’s no penalty for slowing down.
Mistake #2: Being Inconsistent
This one is absolutely critical. Skipping nights or changing your routine confuses your child. If you use the chair method one week, then co-sleep the next week, then go back to the chair method, your child doesn’t learn the new pattern. They learn that if they protest enough, the old way comes back. Consistency matters enormously. Pick your approach and stick with it.
Mistake #3: Responding to Every Single Sound
Once your child is starting to fall asleep, minimize your responses. We know this is hard because you want to help, but if you rush to comfort them every time they fuss or whimper, they won’t learn to self-soothe. Give them time to settle—often 5-10 minutes of quiet fussing—before responding. You might be surprised how often they settle themselves.
Mistake #4: Talking, Singing, or Engaging Too Much
While you’re sitting in that chair waiting for your child to fall asleep, stay quiet. Don’t chat with them, sing songs, or play. Your presence is comforting, but active engagement keeps them awake. Use a calm, quiet voice if you must respond to something, but otherwise, just be peacefully present.
Mistake #5: Not Preparing Your Older Child
For toddlers and older children, take time to explain what’s happening. Use simple words: “We’re going to sit in a chair while you fall asleep. Each night, the chair moves a little farther away. I’ll always be close by. You’re learning to be a great sleeper.” Simple explanations help them understand and cooperate.
Mistake #6: Expecting Perfect Progress
Some nights will be harder than others. Teething, minor illness, developmental leaps, and normal regressions happen. You might need to move the chair back closer for a night or two during these times. This isn’t failure. It’s adjustment. It’s you being responsive to your child’s needs while still working toward independence.
Tips for Faster Success with Chair Method Sleep Training
You want this to work, and you want it to work well. Here are our best strategies for setting yourself up for success.
Tip 1: Start with a Strong Bedtime Routine
The stronger your routine, the easier everything becomes. Spend 20-30 minutes winding down before bedtime. This preps your child’s brain for sleep and sets the stage for the method to work. Bath, story, cuddles, dimmed lights—whatever feels calming to your family. Do it every single night.
Tip 2: Address Basic Needs First
A hungry child won’t sleep, no matter what method you use. A child with a wet diaper won’t sleep. A child who’s too hot or too cold won’t sleep. Make sure your child has eaten recently, their diaper is clean, and the room is a comfortable temperature. Address these basic needs before sitting down with your chair.
Tip 3: Use White Noise
White noise is honestly a game-changer. It masks household sounds and creates a consistent auditory environment. This helps your child focus on settling down rather than being startled by noise from other parts of your home. A simple machine or app works beautifully.
Tip 4: Make Sure They’re Well-Rested During the Day
Well-rested children sleep better at night. Make sure your child is getting enough daytime sleep (naps) and nighttime sleep combined. An overtired child fights sleep and makes bedtime incredibly hard. Balance daytime activities with good nap times.
Tip 5: Give It Real Time
The chair method isn’t fast, but it is sustainable. You’re not just trying to get your child to sleep tonight—you’re teaching skills that will last for years. Trust the process, even when progress feels slow. Even when you want to go backward. Trust it.
Tip 6: Celebrate Every Single Win
Did your child cry less tonight? That’s progress. Did they fall asleep 10 minutes sooner? Celebrate it. Did they stay in bed instead of calling for you repeatedly? That’s huge. These small victories build momentum and motivation. Notice them and feel proud.
Tip 7: Get Support from Others
Sleep training can feel lonely and exhausting. Connect with other parents doing the same thing. Join online communities, talk to your pediatrician, or work with a sleep consultant if you want extra guidance. Support makes everything easier and reminds you that you’re not alone.
Frequently Asked Questions
Can I use the chair method if my child is in a bed instead of a crib?
Absolutely. The chair method works with beds, toddler beds, and cribs. The principle is the same—gradually increasing distance from your child as they fall asleep.
Is the chair method safe?
Yes. You’re in the room with your child, so you can respond to emergencies or needs immediately. At Babyslover, we believe the chair method is one of the safer sleep training approaches because you maintain close supervision.
Can I use the chair method if I have multiple children?
Yes, but it requires planning. You might use the chair method with one child while another sleeps nearby. Some families rotate who gets the chair method first, or they implement it during times when other children are occupied.
What if I see my child crying? Should I comfort them?
Crying is normal during sleep training, especially at first. Brief, self-soothing cries often don’t need a response. If your child is truly distressed, comfort them—this isn’t about ignoring them. Balance support with giving them time to settle.
Can I use the chair method part-time?
Consistency works best, but many families use the chair method on weeknights and use other methods (like co-sleeping) on weekends. This takes longer but can work if you’re consistent during the week.
What do I do if my child has a regression?
Regressions happen during developmental leaps, illness, or big changes. Stay calm and go back a step or two in your chair progression. This isn’t failure—it’s normal. Most children bounce back quickly.
Conclusion
Chair method sleep training works because it’s gentle, gradual, and maintains your connection with your child while building their independence. At Babyslover, we believe you don’t have to choose between supporting your child and teaching them to sleep independently. This approach lets you do both.
If you’re feeling overwhelmed by the sleep struggle, know that you’re not alone. Many parents find that this method gives them hope because they can stay present and involved while their child learns this crucial skill. There’s something beautiful about sitting in that chair, watching your child gradually learn to fall asleep on their own, night after night.
Remember: there’s no perfect approach to sleep training. What matters is finding a method that feels right for your family, your values, and your child’s unique temperament. If this approach resonates with you, give it time and stay consistent. Most families see meaningful progress within 4-8 weeks.
You’ve got this. Your child will learn to sleep, and you’ll get the rest you so desperately deserve. If you need support along the way, reach out to your pediatrician, connect with other parents, or consider working with a sleep consultant. At Babyslover, we’re here to help you navigate this journey with confidence and compassion.
For more guidance on different sleep training approaches, explore our Ferber Method for Sleep Training guide and Bedtime Fading Sleep Training Method to find other options that might work for your family.
1 thought on “Chair Method Sleep Training: Complete Guide with Chart”